Quality Magazine logo
search
cart
facebook twitter linkedin youtube
  • Sign In
  • Create Account
  • Sign Out
  • My Account
Quality Magazine logo
  • NEWS
  • PRODUCTS
    • SUBMIT YOUR PRODUCT
  • CHANNELS
    • AUTOMATION
    • MANAGEMENT
    • MEASUREMENT
    • NDT
    • QUALITY 101
    • SOFTWARE
    • TEST & INSPECTION
    • VISION & SENSORS
  • MARKETS
    • AEROSPACE
    • AUTOMOTIVE
    • ENERGY
    • GREEN MANUFACTURING
    • MEDICAL
  • MEDIA
    • A WORD ON QUALITY PUZZLE
    • EBOOK
    • PODCASTS
    • VIDEOS
    • WEBINARS
  • EVENTS
    • EVENT CALENDAR
    • QUALITY SHOW
    • IMTS
  • DIRECTORIES
    • BUYERS GUIDE
    • NDT SOURCEBOOK
    • VISION & SENSORS
    • TAKE A TOUR
  • INFOCENTERS
    • NEXT GENERATION SPC & QUALITY ANALYTICS
  • AWARDS
    • ROOKIE OF THE YEAR
    • PLANT OF THE YEAR
    • PROFESSIONAL OF THE YEAR
  • MORE
    • eNEWSLETTER
    • INDUSTRY LINKS
    • THE LEADERSHIP SURVEY
    • CLASSIFIEDS
    • MARKET RESEARCH
    • PRODUCT SPOTLIGHTS
    • QUALITY STORE
    • WHITE PAPERS
  • EMAG
    • eMAGAZINE
    • ARCHIVES
    • CONTACT
    • ADVERTISE
  • SIGN UP!
Home » Authors » Mike Oddy

Mike Oddy

Mike Oddy is the technical sales director at Vermont Gage (Swanton, VT). For more information, call (802) 868-2701 Ext. 1123, email [email protected] or visit www.vermontgage.com.

Articles

ARTICLES

Vermont Gage Higbee Cut
Measurement

What is a “Higbee cut”? And Other Related Thread Terms

We are lucky in the metrology and gage manufacturing world to have access to standards maintained by ANSI, ASME, Mil, NIST, DIN, ISO, IEC and many more.
Mike Oddy
February 22, 2025

Understanding industry terminology is vital for success, especially for newcomers and seasoned professionals in new roles. This article explores how standards from organizations like ASME clarify key definitions in metrology and gage manufacturing, helping to prevent costly misunderstandings.


Read More
Red Light HAL 9000
Test & Inspection

AI Technical and Gage Data Searches: "Open the pod bay door, Hal."

What do Generative AI Searches have to do with inspection and gages? A great deal.
Mike Oddy
November 17, 2024

Generative AI Searches are transforming how professionals access technical data in fields like inspection and gages. While these tools deliver quick results, reliance on their outputs can lead to inaccuracies, as shown by discrepancies in thread specifications. Understanding the strengths and limitations of Generative AI is essential for ensuring the accuracy and relevance of information used in gage calibration and metrology.


Read More
Close-up of circle tube with spiral inside, tunnel of spiral
Quality 101

Pre-Plate Threads: 60° Thread Form

Nobody wants to make or sell a custom gage you can’t use and are unable to return.
Mike Oddy
May 3, 2024

Gage accuracy depends on product info. Thread form plating changes pitch diameter. Compensate for buildup to make correct pre-plate allowances. 60° UN threads change pitch diameter by 4x plating thickness.


Read More
QM 1223 FEAT Test Tap Horizontal
Test & Inspection

How Do Tap Limits Affect Gage Selection?

It is not always as simple as it sounds.
Mike Oddy
November 2, 2023

One of the more frequent questions we receive is: I am tapping a ¼-20 UNC 2B internal thread with an “H13” tap, what gage do I need to inspect the threaded holes in my parts after tapping?


Read More
QM 0323 Quality101 NPT Taper Pipe Thread
Quality 101

Taper Pipe Thread Inspection, NPT

If you take care of your gages, they will take care of you and the parts you manufacture.
Mike Oddy
March 2, 2023

Taper Pipe Threads are one of the more challenging threads to produce and measure. The ASME B1.20.1-2013 Pipe Threads, General Purpose (Inch) is the current standard that covers both the part thread specifications and the gages for NPT, NPSC, NPTR, NPSM and NPSL threads.


Read More
QM0521-FT-Quality-101-p1FT-Rng-1_510-Go-1170x878.jpg
Quality 101

Cylindrical Ring Gages: One Ring to Rule Them All

Cylindrical ring gages may be used as master gages to set variable measuring tools.
Mike Oddy
May 5, 2021

Cylindrical ring gages have a number of inspection purposes. They are used as Go/No-Go gages to inspect the outside diameter of a shaft or rod. They are masters for dial bore gages, internal micrometers and coordinate measuring machines (CMMs). 


Read More
feeler gage

Gages for Screw Thread Inserts (STI)

It is critical for both the gage manufacturer and the metrology lab to know the industry standard for the gages being manufactured or calibrated.
Mike Oddy
November 2, 2020

Screw thread inserts (STI) require the threaded hole to be inspected prior to inserting the threaded insert or coil. The dimensions and tolerances for the gages used to inspect these threads have been a bit confusing over the past 30 years. 


Read More
inspection tools

The Gage Selection Conundrum

The correct selection of measuring devices will ensure the quality, price and delivery of the products we manufacture and use.
Mike Oddy
May 1, 2020

Selecting gages and other types of measuring tools can be challenging. It does not matter if you are an experienced or novice gage user, tool crib manager, lab manager or buyer. 


Read More
Thread gaging

Thread Classes and Setting Plug Gages

Product tolerances and dimensions always dictate the gage tolerances and dimensions.
Mike Oddy
October 1, 2019

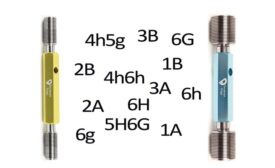
Thread classes for product threads, and by extension the gages used to inspect them, can become a bit of alphabet soup. Some find the requirements confusing.


Read More
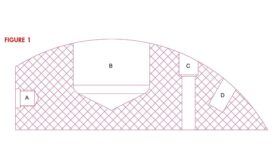
Figure 1 shows a sectioned or cut part view of a few of these challenges.

Depth Measurement Challenges

Let’s look at some of the part and gage features that may impede accurate depth measurement.
Mike Oddy
October 3, 2017

The measurement of the depth of a hole sounds straightforward and simple. In many cases it is. In others, there are design features of both the part and the gage that must be considered to insure an accurate measurement and a properly assembled or functioning part. 


Read More
View All Articles by Mike Oddy
Subscribe For Free!
  • eMagazine Subscriptions
  • eNewsletters
  • Online Registration
  • Subscription Customer Service
  • Manage My Preferences

More Videos

Popular Stories

Technician working with the Vision Engineering LVC200.

Difference Between Calibration and Verification

Woman working in quality control, measuring a workpiece.

AI’s Double-Edged Sword: Security and Compliance in Manufacturing

QM0525-FEAT-A3-Automation-p1FT-Quality-Inspection.jpg

The Next Frontier of Automation: Quality Assurance in an AI-Driven Era

May 21 Quality Hexagon Live Webinar

Events

May 21, 2025

The Evolution of Laser Radar: Measuring Large Scale From Distance With High Accuracy

This webinar, featuring a live demonstration, will showcase the evolution of Hexagon’s direct scanning laser trackers: cutting-edge technology that now delivers traditional reflector-tracking accuracy to non-contact, large-part scanning.

View All Submit An Event

Products

Lean Manufacturing and Service Fundamentals, Applications, and Case Studies

Lean Manufacturing and Service Fundamentals, Applications, and Case Studies

See More Products
Play Quality's captivating word-guessing game! There's a new word every Friday.

Stay in the know with Quality’s comprehensive coverage of
the manufacturing and metrology industries.

eNewsletter | Website | eMagazine

JOIN TODAY!
  • RESOURCES
    • Advertise
    • Contact Us
    • Directories
    • Store
    • Want More
  • SIGN UP TODAY
    • Create Account
    • eMagazine
    • eNewsletter
    • Customer Service
    • Manage Preferences
  • SERVICES
    • Marketing Services
    • Market Research
    • Reprints
    • List Rental
    • Survey/Respondent Access
  • STAY CONNECTED
    • LinkedIn
    • Facebook
    • YouTube
    • X (Twitter)
  • PRIVACY
    • PRIVACY POLICY
    • TERMS & CONDITIONS
    • DO NOT SELL MY PERSONAL INFORMATION
    • PRIVACY REQUEST
    • ACCESSIBILITY

Copyright ©2025. All Rights Reserved BNP Media.

Design, CMS, Hosting & Web Development :: ePublishing