Test & Inspection
Portable Hardness Test Methods and When to Use Them
The most important step is to familiarize yourself with the limitations of the test method to avoid inaccurate results.

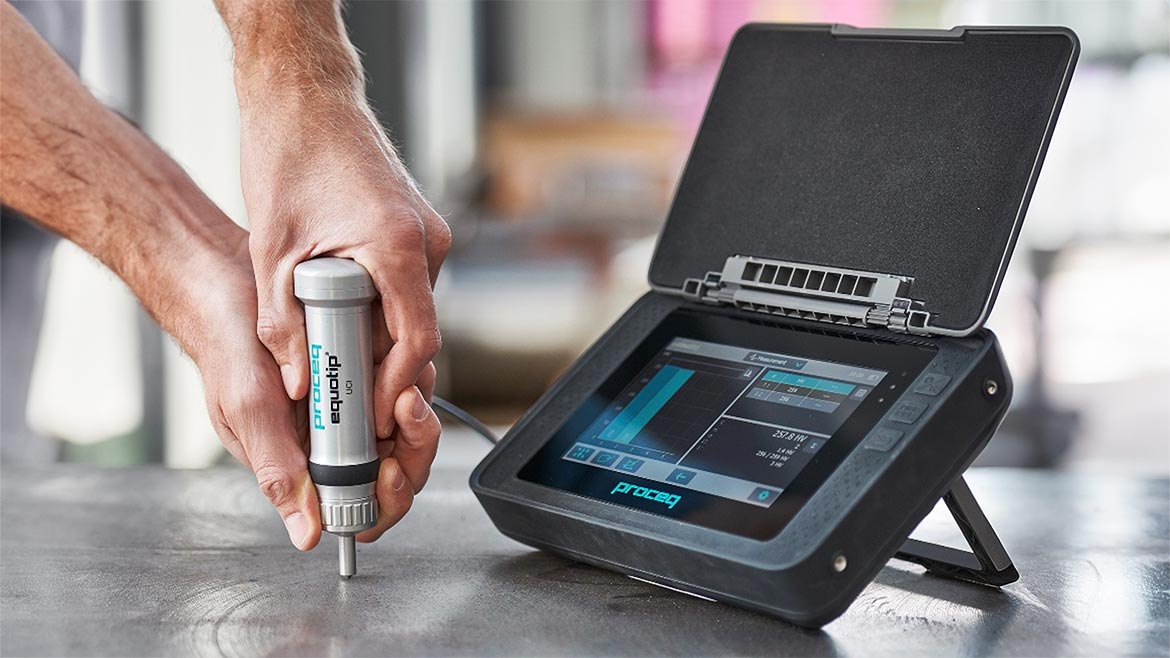
Typical A1038 comparative hardness testing machine. Image courtesy of Screening Eagle Technologies AG, Schwerzenbach, Switzerland.
Hardness testing began in the 1700s and continued into the early 1800s as Mohs developed his scratch test for minerals and other developing methods for scratch testing of metals. As the importance of metal hardness testing became realized, new hardness test methods continued to be developed in the later 1800s through the early 1900s. These methods moved away from the scratch test and towards measuring the penetration of an indenter into the specimen under force. Many variations of indenter shape and force were proposed, each attempting to overcome the deficiencies of previous methods. The industry settled on and fully adopted three of the most popular laboratory hardness methods: Brinell, Rockwell, and Vickers.
ASTM International[1], founded in 1898 as The American Society for Testing and Materials, is the primary standard developing organization in the Western Hemisphere. Brinell was standardized as ASTM E10 in 1924, Rockwell as ASTM E18 in 1932, and Vickers as ASTM E92 in 1952. These three standards all described stationary hardness testing machines intended to be installed in one place (e.g. metrology laboratory, quality inspection station) due to their design and construction. The robustness of these fixed-location machines has led to the respective standards to be used for material specifications. A main drawback to these methods is that they require the specimen under test to have opposite sides that are parallel and fit inside the machine. Industry quickly realized the need for a portable solution and developed other methods accordingly.

Portable machines that follow the Rockwell and Brinell test principles using the same indenters and test forces are standardized under ASTM E110. These devices generally resemble a clamp to hold the machine in position on the specimen and provide support for the test forces. Adaptations for larger testing pieces are available such as larger clamps or chains. Test forces are generally applied mechanically for testing machines that follow Rockwell, but hydraulics are usually used for those that follow Brinell due to the much higher test forces.
A portable hardness testing machine that conforms to E110 is generally considered to be less accurate than the fixed-location machines not only due to the challenges of alignment with the test surface (indentation must be normal to the surface), but also because one or more parameters of the machine cannot be directly verified. Direct verification is important because it assures the user that the results are not just a coincidence of errors and that the test is performed with precision. This means that portable hardness testing machines that follow E110 should not be used for material certifications because they do not meet the more stringent requirements of the ASTM standards E10 and E18. Rather, E110 hardness testing machines are quite helpful for in-process testing or testing of parts that cannot be tested in a fixed-location machine. For an E110 Brinell testing machine, this means testing large castings, plates, and forgings where access is available to the opposite side of the piece. E110 Rockwell machines are used on thinner materials like fabricated or machined metals where the smaller indentation is advantageous.

The railroad industry could not use these types of clamping hardness machines on the rail welds because of the lack of access to opposite sides so they developed a comparative testing machine that is standardized under ASTM A833. These machines use a reference bar of known hardness that is inserted into an apparatus that holds a hardened steel ball between the reference bar and the surface under test. The test force is applied by hitting the holder with a hammer of sufficient mass. This results in two indentations – one on the reference bar and one on the specimen under test. The Brinell hardness number is calculated from measuring and comparing the diameters of the resulting indentations. This test method is simple to use and therefore quite popular. The comparative nature of the test allows it to be used on even thinner parts as long as no bulging is seen on the opposite side of the specimen under test, and it does not require access to opposite sides to support the test force. This makes it great for testing the same things as Brinell (e.g. plates, castings, forgings) and then more.

Pipeline work is one of the more common applications of ASTM A833, but it is often misused in some cases. The ball indenter will give good results on the parent metal of a pipe. However, some inspectors also try to use it to measure hardness of the heat affected zones on welds. This is not a valid application because the indentation is too large and the measurement will include some of the base metal as well as the heat affected zone. Users should always confirm that the indentation is fully within the area of interest and that there is adequate spacing to any edge.
The UCI (Ultrasonic Contact Impedance) test method standardized as ASTM A1038 is a comparative hardness test method that commonly uses a Vickers indenter, but the size of the indentation is not measured optically like in traditional Vickers testing. Rather, the indentation is measured by a frequency shift of the probe tip. A UCI probe has the indenter fixed to the end of a steel rod that is excited into resonance in the ultrasonic frequency range. The test force is set by the probe, either mechanically with springs and switches or by use of a load cell, generally with a load of 1kg, 5 kg or 10 kg. The natural resonance frequency is measured by the instrument as the probe is pressed into the surface by the user until the total test force is achieved. The resonant frequency of the tip shifts as the indenter penetrates the surface. Hard materials have a smaller indentation and corresponding small frequency shift while softer materials have a larger indentation and frequency shift. The frequency shift is measured when the test force is achieved, and the hardness is then calculated from the measured frequency shift.
It is important to note that this comparative method of measuring hardness is very dependent on the elastic modulus of the specimen under test. Devices are typically calibrated by the manufacturer for a metal with elastic modulus of 210 GPa, so they must be verified for proper operation on material within 5 GPa of the manufacturer’s calibration. Then they must be adjusted for the elastic modulus of the material under test, which can be easily done on a specimen of the material that has a known hardness measured by a fixed-location hardness testing machine. The UCI test method can be used most anywhere, as long as the specimen thickness at the point of test has a minimum thickness of 2 to 3 millimeters. It is also independent of the effects of gravity at test forces of 1 kg and higher. All this means it is excellent for testing the heat affected zones of welds for proper post weld heat treatment, machined parts of all sorts, and even castings and forgings.
Another very popular portable hardness test method is the Leeb hardness test standardized under ASTM A956, also commonly referred to as the rebound hardness test. The Leeb hardness device launches a hard, spherical impact body against the surface and measures the ratio of the rebound velocity to the impact velocity. The harder the surface; the higher the ratio. This ratio is a measure of the hardness assuming all the velocity loss (kinetic energy) is caused by making the indentation in the surface. This assumption holds true as long as the specimen under test has enough mass and thickness to prevent velocity loss due to vibration or movement of the specimen. This means that a specimen must be at least 1 inch thick under the point of test and weigh more than 11 pounds. Testing anything thinner or lighter will result in inaccurate results. Pipe and tube are the most misused application of the Leeb test because of their wall thickness is usually below the minimum thickness requirement. Leeb testing is best done on large, massive objects like forgings, castings, steel mill rolls and the like.

A more recent development happened in 2018 when portables were added to E18 (Rockwell) and E10 (Brinell) in order to accommodate modern technology that might allow for a mechanism that can both be portable and meet the stringent tolerances for direct verification of the hardness testing machine parameters. There are quite a few portable hardness testing machines that claim to comply with the E10 and E18 standards, but the user is strongly cautioned to confirm that the machine they intend to use has had a valid direct verification performed before using it to satisfy material specification requirements. In fact, some material specifications are now specifying the use of fixed-location hardness testing machines for reporting material conformance.
There are more portable hardness methods used in the industry today than those mentioned here, either similar in principle or less commonly used. Regardless of the method used, the most important step before implementing portable hardness testing machines is for the user to familiarize themselves with the limitations of the test method to avoid a misapplication of the method that will result in inaccurate hardness test results.
[1] For referenced ASTM standards, visit the ASTM website, www.astm.org, or
contact ASTM Customer Service at [email protected].
Looking for a reprint of this article?
From high-res PDFs to custom plaques, order your copy today!


